
Saturday, March 07, 2009

Anticipation Builds for Windows Live Movie Maker

Windows Live Movie MakerThe underlying tenet of the Windows Movie Maker team has always been to make an extremely easy-to-use program for editing movies. Movie Maker has been a place where you can quickly bring in your camcorder footage, trim and reorder clips, overlay some music, add some titles (along with captions and credits) then save the results out as a movie file.

From there it has often been hard to get that to the point where it can be shared (a 10MB limitation on e-mailing, a separate step for uploading to a video site like YouTube, extra software for burning the movie onto a DVD). And there's always been an issue with getting certain file types to import and edit correctly. The only types that have consistently worked are the native import types of DV-AVI (mini-DV camcorder) and WMV. When file types didn't work, it required a user to convert them, suffer editing weirdness like green screens, saving that would hang, outright crashes and the like.

Vista Movie Maker made some strides in the areas of real time preview, ability to capture HD video into DVR-MS files for editing, usage of the GPU for high-quality transitions/effects and the ability to create a DVD using DVD Maker. But even now there are issues that arise with file types, occasional crashes, publishing problems, etc.

In response, Microsoft is in the process of creating a new Windows Live Movie Maker (WLMM) as part of Windows Live Essentials. The program is currently in a "beta" release, but other reviewers, along with myself would really call this more of a placeholder. It's almost like they have gone back to version 1.0 with no titles, a single fade transition, a couple black/white effects, etc. And the most startling missing feature seems to be the lack of a timeline.

So, is this what we should expect? Will there be a timeline in the final version? How will "power" users get control over their project if it all seems to be a storyboard? And will we have the ability to build custom transitions and effects like we could in prior releases to extend the capabilities? Will it handle HD video better? Will it be easy to publish and share my video? Will it handle new file types?

Well, I can't disclose all of what I learned recently in a visit to the Microsoft Campus in Redmond, but I can say I am excited. My concerns about a missing timeline are partially allayed. And I can see that they haven't abandoned customization. In fact, Eric Doerr has hinted that the new rendering engine in WLMM will take advantage of the GPU in ways it hasn't so far. Trust me, I think Windows Live Movie Maker will have the simplicity that we all appreciate for quickly creating movies, but with the fancy features we all love to show off. While it isn't there in the current public beta, stay tuned.

Thursday, October 09, 2008

Aspect Ratios, HD and Windows Movie Maker

Canon HV20I'm having a lot of fun with HD video. I'm hoping that others are seeing that HD video will be the standard for home video, but with that comes challenges. The hardest part is dealing with the tools we have for editing video; it's not a seamless environment yet. I can't take stuff I've captured in Sony Vegas and easily use it in Windows Movie Maker. Similarly, if I want to capture something in WMM, it doesn't come in seamlessly into Sony Vegas.
For example, recently our family took a camping trip to Mammoth Lakes. I had set up our camera and filmed 40+ minutes of us setting up the tent. Obviously, I didn't want to have people watch a full 40 minutes, I wanted to speed it up but with variable speeds, slower at the beginning, faster in the middle, slower at the end.

Windows Movie Maker only has the ability to increase the speed by powers of 2 (double, quadruple, etc.) by applying the Speed Up, Double effect up to 6 times. Even with my custom effects for speed (that allow other speed rates), I couldn't get the effect I wanted. So I switched to Sony Vegas Pro 8. For some reason it didn't like the dvr.ms format that I captured in WMM. So I had to recapture it in Vegas. That was okay, but then I found that Sony Vegas doesn't let you speed up more than 4 times. Since I wanted to get our 40 minutes down to about 1 minute, it meant I would need multiple passes.

My plan was to do the first pass in Sony Vegas with variable speeds, then do an overall speed up using Movie Maker. Things were going fine... I did the first pass and saved the clip in a high-bitrate WMV format. Then I brought it into WMM and applied the speed effect to get it down to a minute. I published the movie.

What I discovered was that WMM took only the top, left corner of the video. So rather than thinking I had 1920x1080 video, it saw it as 720x480 and only took those pixels in the upper right. I'm thinking it must be related to the format that Sony exports in that it must not be *true* WMV format, or is otherwise causing WMM to get confused.

In the end, I had to do all the work in Sony Vegas with about 3 (or was it 4) passes there. The result is great, but it took a lot more time than I thought it should. I hope we get to the point where things will be seamless and all formats will be recognized. Will we get there? Who knows?

Thursday, November 15, 2007

Negative and Bloom Effects for Windows Movie Maker 6.0

Blaine's Bloom/Negative EffectsHere's a couple new effects for the Vista version of Movie Maker. The first two effects are called 'Bloom In' and 'Bloom Out'. They create a bright glare to come from lighter items in the video. If you use Bloom Out at the end of a clip, and Bloom In at the beginning of the next, you can get a cool transition, that you've probably seen a lot on TV. The other effect is a Negative effect which reverses all the color values. Preview a video of the Bloom and Negative effects

There are two installers depending on whether you are running WMM 6.0 on a 64-bit or 32-bit version of Windows. The installer will put the necessary files into, C:\Program Files\Movie Maker\Shared.
Windows Movie Maker 6.0:
Blaine's Bloom and Negative Effects (64-bit)
Blaine's Bloom and Negative Effects (32-bit)
After installing, you'll have the new effects the next time you start up Movie Maker.

Saturday, September 15, 2007

Custom PSP Overlay Title for Windows Movie Maker

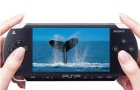
Preview PSP Overlay TitleFollowing my series of custom Movie Maker image overlays, here's an overlay where your video appears on the screen of a PSP. This looks best with widescreen video, but you can use standard 4:3 video too.

There are two installers depending on whether you are running on a 64-bit or 32-bit version of Windows. The installer will put the necessary files into, C:\Program Files\Movie Maker\Shared.
Blaine's PSP Overlay Title (64-bit)
Blaine's PSP Overlay Title (32-bit)
To use the new title
  • Go to 'Tools' > 'Titles and Credits' > 'Title on the selected clip'.

  • Click on 'change the title animation'.

  • Under your list of one line titles should be a new one called PSP Overlay

  • Pick it then click 'Done'.

  • Stretch the title so that it extends for the length of your clip.

  • Sunday, September 02, 2007

    Custom TV Overlay for Windows Movie Maker

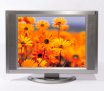
    Preview TV Overlay TitleOne of the neat things you can do with custom titles is to resize the video and overlay an image. Using this technique, you can easily overlay an image of a TV screen, for example. (Click here for a sample video with a TV overlay).

    Note: This title has been designed to work with either WMM 2.1 (XP) or WMM 6.0 version. It also works whether your project has a 4:3 or 16:9 aspect ratio.

    There are two installers depending on whether you are running on a 64-bit or 32-bit version of Windows. The installer will put the necessary files into, C:\Program Files\Movie Maker\Shared.
    Blaine's TV Overlay Title (64-bit)
    Blaine's TV Overlay Title (32-bit)
    To use the new title
  • Go to 'Tools' > 'Titles and Credits' > 'Title on the selected clip'.

  • Click on 'change the title animation'.

  • Under your list of one line titles should be a new one called TV Overlay

  • Pick it then click 'Done'.

  • Stretch the title so that it extends for the length of your clip.