Showing posts with label overlay. Show all posts

Saturday, September 21, 2013

Fading Logo Overlays for WMM 6.0

For years people have been asking for custom titles for putting a logo or watermark on their video.

There have been solutions for this in Windows Movie Maker 6.0 previously but it required customization of the XML. It also didn't have an ability to fade the logo in and out. I've decided to create an installer that makes it much easier, doesn't require editing of the XML and also adds a fading version.

There are two installers depending on whether you are running on a 64-bit or 32-bit version of Windows. The installer will put the necessary files into, C:\Program Files\Movie Maker\Shared.
Blaine's Logo Overlay Titles (64-bit)
Blaine's Logo Overlay Titles (32-bit)
The packaged installer comes with two sample logos in C:\Program Files\Movie Maker\Shared\AddOnTFX\BlaineLogoOverlays. To use your own logo, edit the .png images to replace my logo with your own. In order to create/edit your own, you'll need a program that can create .png images with transparency. Some freeware options are GIMP and Paint.net.

To use the new title
  • Go to 'Tools' > 'Titles and Credits' > 'Title on the selected clip'.

  • Click on 'change the title animation'.

  • Under your list of one line titles there will 4 new title animations: Blaine's Logo Overlay (16:9), Blaine's Logo Overlay (16:9) Fading, Blaine's Logo Overlay (4:3), Blaine's Logo Overlay (4:3) Fading

  • Pick the one that matches the aspect ratio of your project and whether you want it solid or fading. Then click 'Done'.

  • Stretch the title so that it extends for the length of your clip.


  • This was originally discussed on the Windows Movie Maker Forums.
    Saturday, March 16, 2013

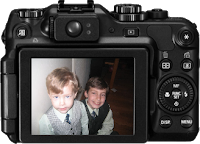
    Custom Camera Back Overlay for WMM 6.0

    Camera back overlayFollowing my series of custom Movie Maker image overlays, here's an overlay where your video appears on the back of a digital camera.

    There are two installers depending on whether you are running on a 64-bit or 32-bit version of Windows. The installer will put the necessary files into, C:\Program Files\Movie Maker\Shared.
    Blaine's Camera Back Overlay (64-bit)
    Blaine's Camera Back Overlay (32-bit)
    To use the new title
  • Go to 'Tools' > 'Titles and Credits' > 'Title on the selected clip'.

  • Click on 'change the title animation'.

  • Under your list of one line titles there will a new title animation: Camera Back Overlay (4:3)

  • Pick this then click 'Done'.

  • Stretch the title so that it extends for the length of your clip.

  • Thursday, August 23, 2012

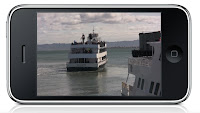
    Custom iPhone Overlay Title for WMM 6.0

    iPhone OverlayFollowing my series of custom Movie Maker image overlays, here's an overlay where your video appears on the screen of a iPhone.

    There are two installers depending on whether you are running on a 32-bit or 64-bit version of Windows. The installer will put the necessary files into, C:\Program Files\Movie Maker\Shared.
    Blaine's iPhone Overlay Title (64-bit)
    Blaine's iPhone Overlay Title (32-bit)
    To use the new title
  • Go to 'Tools' > 'Titles and Credits' > 'Title on the selected clip'.

  • Click on 'change the title animation'.

  • Under your list of one line titles there will be two new titles: iPhone Overlay FS (4:3) or iPhone Overlay WS (16:9)

  • Pick the one that matches your aspect ratio then click 'Done'.

  • Stretch the title so that it extends for the length of your clip.

  • Sunday, June 19, 2011

    Custom Camcorder Overlay Title for Windows Movie Maker

    Preview Camcorder Title OverlayI thought it would be fun to create an overlay that would look like you were recording through a camcorder. The overlay has a battery icon, a red recording symbol and the word 'REC' which flashes in the corner. As you can see from the sample video, I've created widescreen (16:9) and fullscreen (4:3) versions.

    Note: These titles will work in WMM 2.1 (XP) and WMM 6.0 (Vista). I've provided XML for both versions in the installers.

    There are two installers depending on whether you are running on a 64-bit or 32-bit version of Windows. The installer will put the necessary files into, C:\Program Files\Movie Maker\Shared.
    Blaine's Camcorder Overlay Title (64-bit)
    Blaine's Camcorder Overlay Title (32-bit)
    To use the new title:
    Go to 'Tools' > 'Titles and Credits' > 'Title on the selected clip'.
    Click on 'change the title animation'.
    Under your list of one line titles should be two titles:
  • Camcorder Overlay (16:9)

  • Camcorder Overlay (4:3)

  • Choose the one that matches your project, then click 'Done'.
    Stretch the title so that it extends for the length of your video.

    Saturday, September 15, 2007

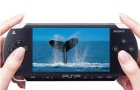
    Custom PSP Overlay Title for Windows Movie Maker

    Preview PSP Overlay TitleFollowing my series of custom Movie Maker image overlays, here's an overlay where your video appears on the screen of a PSP. This looks best with widescreen video, but you can use standard 4:3 video too.

    There are two installers depending on whether you are running on a 64-bit or 32-bit version of Windows. The installer will put the necessary files into, C:\Program Files\Movie Maker\Shared.
    Blaine's PSP Overlay Title (64-bit)
    Blaine's PSP Overlay Title (32-bit)
    To use the new title
  • Go to 'Tools' > 'Titles and Credits' > 'Title on the selected clip'.

  • Click on 'change the title animation'.

  • Under your list of one line titles should be a new one called PSP Overlay

  • Pick it then click 'Done'.

  • Stretch the title so that it extends for the length of your clip.

  • Sunday, September 02, 2007

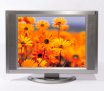
    Custom TV Overlay for Windows Movie Maker

    Preview TV Overlay TitleOne of the neat things you can do with custom titles is to resize the video and overlay an image. Using this technique, you can easily overlay an image of a TV screen, for example. (Click here for a sample video with a TV overlay).

    Note: This title has been designed to work with either WMM 2.1 (XP) or WMM 6.0 version. It also works whether your project has a 4:3 or 16:9 aspect ratio.

    There are two installers depending on whether you are running on a 64-bit or 32-bit version of Windows. The installer will put the necessary files into, C:\Program Files\Movie Maker\Shared.
    Blaine's TV Overlay Title (64-bit)
    Blaine's TV Overlay Title (32-bit)
    To use the new title
  • Go to 'Tools' > 'Titles and Credits' > 'Title on the selected clip'.

  • Click on 'change the title animation'.

  • Under your list of one line titles should be a new one called TV Overlay

  • Pick it then click 'Done'.

  • Stretch the title so that it extends for the length of your clip.

  • Saturday, March 24, 2007

    Custom Photo Album Title for Windows Movie Maker

    Preview Photo Album Title OverlayHave you ever wanted to make your photos or videos look like they are part of a photo album? (See my sample album) If so, I've just created a custom title overlay that can be used in Windows Movie Maker. It makes it look like your photos or video are mounted in a photo album, with a white edge and notched photo corners.

    Note: This title has been designed to work with either WMM 2.1 (XP) or WMM 6.0 (Vista) version of Movie Maker.

    There are two installers depending on whether you are running on a 32-bit or 64-bit version of Windows. The installer will put the necessary files into, C:\Program Files\Movie Maker\Shared.
    Blaine's Photo Album Title (64-bit)
    Blaine's Photo Album Title (32-bit)
    To use the new title
  • Go to 'Tools' > 'Titles and Credits' > 'Title on the selected clip'.

  • Type the text you want to appear below the photo as a caption.

  • Click on 'change the title animation'.

  • Under your list of one line titles should be a new one called Photo Album

  • Pick 'Photo Album', then click 'Done'.

  • Stretch the title so that it extends for the length of your photo.

  • Repeat as needed for each photo or clip.
  • Sunday, March 18, 2007

    Custom Torn Page Titles in the style of Veronica Mars, Updated for Vista

    Sample Video of Torn Pages TitleThe UPN show Veronica Mars opens with video of the various cast members and torn notebook pages showing their names. I was inspired by a post on the Windows Movie Maker forums, to create a similar look.

    Note: These titles will work in WMM 2.1 (XP) and WMM 6.0 (Vista). I've provided XML for both versions in the installers.

    Choose the correct 64-bit or 32-bit installer link below. Run the installer and it will install the custom XML code and the image files you'll need.
    Blaine's Torn Pages (64-bit)
    Blaine's Torn Pages (32-bit)
    To use the new title:
  • Go to 'Tools' > 'Titles and Credits' > 'Title on the selected clip'.

  • Type the text you want to appear on the torn page.

  • Click on 'change the title animation'.

  • Under your list of one line titles should be new ones called Torn Page (Bottom) and Torn Page (Right). Pick the one you want to use.

  • For my example, I switched fonts to a serifed Playbill font, but you can choose any font or leave it as the default.

  • Click 'Done'.

  • Stretch the title so that it extends for the length of your clip.

  • Repeat as needed for each title.
  • Thursday, February 15, 2007

    Custom TV Ratings Titles updated for WMM 6.0

    Are you using Windows Movie Maker to edit your home videos? Have you ever wanted to add the TV Ratings to the top of your home videos? I created a set of custom titles that can be used in Windows Movie Maker to overlay the various TV Ratings (Y, Y7, G, PG, 14, MA) to the top left corner of your video.

    Note: These titles have been designed to work with either WMM 2.1 (XP) or WMM 6.0 version.

    There are two installers depending on whether you are running on a 64-bit or 32-bit version of Windows. The installer will put the necessary files into C:\Program Files\Movie Maker\Shared.
    Blaine's TV Ratings Titles (64-bit)
    Blaine's TV Ratings Titles (32-bit)
    To use the new titles, go to 'Tools' > 'Titles and Credits' > 'Title on the selected clip' > 'change the title animation'. Under your list of one line titles should be 6 new ones called:
  • TV Rating (Y)

  • TV Rating (Y7)

  • TV Rating (G)

  • TV Rating (PG)

  • TV Rating (14)

  • TV Rating (MA)


  • If you want an additional subtitle, type it into the text fields, otherwise just type a single space. Click 'Done'.