Thursday, December 29, 2011

Blaine's TV Signal Effects

Blaine's TV Signal Effects
Back in the "old" days, we all had analog TVs where the picture was drawn by an electron beam on a cathode ray tube (CRT). The resulting picture often had noise in the signal, visible scan lines and a slight curvature to the screen. Well, now you can relive those days by applying one of my TV Signal Effects. These effects work with Windows Movie Maker 6.0 (either under Vista or Windows 7).

To install the TV Signal Effects into Windows Movie Maker, you have a choice of installers depending on whether you are running WMM 6.0 on a 64-bit or 32-bit version of Windows. Pick the correct installer and it will put the necessary files into C:\Program Files\Movie Maker\Shared.
Windows Movie Maker 6.0:
Blaine's TV Signal Effects (64-bit) Installer
Blaine's TV Signal Effects (32-bit) Installer
After restarting Windows Movie Maker, you should have 4 new TV Signal effects with corresponding icons:
  • TV Signal (All) - all 3 effects applied at once (curvature, noise and scanlines)
  • TV Signal (Curvature) - distorts the picture to give it a slight curvature.
  • TV Signal (Noise) - adds some random "dot crawl" to the clip.
  • TV Signal (Scanlines) - draws the screen in bands of light and dark, with some color fringing.


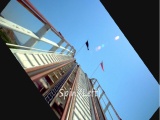
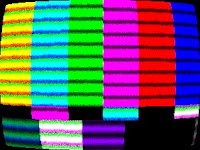
  • You can apply the individual effects, or just use the combined TV Signal (All) effect. You might also want to apply a Blur effect or Grayscale effect, especially if you are simulating a black and white TV, or maybe a surveillance monitor.

    Note: These transitions require the architecture of WMM 6.0 and can't be made to work on versions 2.6 or earlier.

    Monday, December 12, 2011

    Blaine's Custom Transition Pack 3 (Paper Fold)

    Blaine's Transition Pack 3Before the end of the year, I wanted to publish another set of transitions for Windows Movie Maker 6.0*. These are called "Paper Fold" transitions which will be obvious if you watch the Transition Pack 3 - Sample Video.

    These transitions require the use of Rehan's ShaderTFX add-on. If you've never installed this before, follow the directions on his website and test they work first. If you've already installed a copy of ShaderTFX (registered or unregistered), you can skip these steps.

    There are two installers depending on whether you are running WMM 6.0 on a 64-bit or 32-bit version of Windows. The installer will put the necessary files into, C:\Program Files\Movie Maker\Shared.
    Prerequisite: Rehan's ShaderTFX add-on.

    Windows Movie Maker 6.0:
    Blaine's Transition Pack 3 (64-bit) Installer
    Blaine's Transition Pack 3 (32-bit) Installer

    After restarting Windows Movie Maker, you should have 7 new Paper Fold transitions with corresponding icons. They all look like the screen is being folded down the middle and then it opens up to the new clip. The only difference between the clips is the color background that appears.

    *Note: These transitions require the architecture of WMM 6.0 and can't be made to work on versions 2.6 or earlier. For anyone that wants to customize the background color, check the .xml.

    Saturday, October 08, 2011

    Custom Camera Shutter and Letterbox Effects for Windows Movie Maker 6.0 (Updated)

    Preview Blaine's Letterbox EffectsUpdated! This package has been updated with a camera shutter effect and white letterbox bars. Enjoy!

    There have been lots of requests on the forums for a letterbox/widescreen effect which adds bars to the top and bottom of your video. Well, I went one step farther and added a couple more effects that let you have the bars appear and disappear. Here's a sample video of the moving letterbox effects.

    Note: These effects take advantage of the effects architecture of Windows Movie Maker 6.0 and therefore will not work in XP. There are other solutions for XP such as a letterbox title.

    There are two installers depending on whether you are running WMM 6.0 on a 32-bit or 64-bit version of Windows. The installer will put the necessary files into, C:\Program Files\Movie Maker\Shared.
    Windows Movie Maker 6.0:
    Blaine's Letterbox Effects (32-bit)
    Blaine's Letterbox Effects (64-bit)
    After installing, you'll have new effects called:
  • Camera Shutter - quick in and out (New)

  • Letterbox - static letterbox in black

  • Letterbox (In) - adds letterbox in black

  • Letterbox (Out) - removes letterbox in black
  • Letterbox White - static letterbox in white (New)

  • Letterbox White (In) - adds letterbox in white (New)

  • Letterbox White (Out) - removes letterbox in white (New)
  • Blaine's ASCII Text Effects for Windows Movie Maker 6.0 (Updated!)

    Blaine's ASCII Text EffectUpdated! This package has been updated with 3 different effects (Text, Binary and Japanese). Enjoy!

    Have you heard of ASCII Art? It's a method of drawing pictures using just the characters on your keyboard. How cool would it be if you could apply an effect in Windows Movie Maker to have your photos or videos instantly converted to ASCII Art? Well with my latest ASCII Text effects you can do it very easily.

    A couple notes:
    These effects require a registered copy of Rehan's ShaderTFX add-on. It will also work if you are still within the trial period of ShaderTFX. If you've never installed ShaderTFX before, follow the directions on Rehan's website and test that his transitions and effects work first. If you've already installed and registered a copy of ShaderTFX, you can skip these steps.

    For a preview of what these effects look like, check out Blaine's ASCII Text Effects (Updated)

    For the new effects, there are two installers depending on whether you are running WMM 6.0 on a 64-bit or 32-bit version of Windows. The installer will put the necessary files into, C:\Program Files\Movie Maker\Shared.
    Prerequisite: Rehan's ShaderTFX add-on (registered or unexpired!).

    Windows Movie Maker 6.0:
    Blaine's ASCII Text Effects (64-bit) Installer
    Blaine's ASCII Text Effects (32-bit) Installer

    After restarting Windows Movie Maker, you should have three new effects called:
  • ASCII Binary - Uses just zeroes and ones

  • ASCII Japanese - Uses Japanese katakana symbols

  • ASCII Text - Uses letters, numbers and symbols


  • Just apply one of these effects to your video like any other effect. Often you may want to apply a 'Brightness, Increase' once or twice, or a Blur effect to your clip before the ASCII effect. Brightness added afterwards can also help.

    *Note: These effects require the architecture of WMM 6.0 and can't be made to work on versions 2.6 or earlier, nor will it work on Windows Live Movie Maker.

    Tuesday, August 02, 2011

    Blaine's Custom Transition Pack 2 (MultiSlide)

    Blaine's Transition Pack 2Time for another pack of transitions for Windows Movie Maker 6.0*. I call these "MultiSlide" transitions. Check out the Transition Pack 2 - Sample Video and you'll see why.

    These transitions require the use of Rehan's ShaderTFX add-on. If you've never installed this before, follow the directions on his website and test they work first. If you've already installed a copy of ShaderTFX (registered or unregistered), you can skip these steps. There are two installers depending on whether you are running WMM 6.0 on a 64-bit or 32-bit version of Windows. The installer will put the necessary files into, C:\Program Files\Movie Maker\Shared.
    Prerequisite: Rehan's ShaderTFX add-on.

    Windows Movie Maker 6.0:
    Blaine's Transition Pack 2 (64-bit) Installer
    Blaine's Transition Pack 2 (32-bit) Installer

    After restarting Windows Movie Maker, you should have 7 new transitions with corresponding icons:
  • MultiSlide (2 columns) - Each column slides in opposite directions

  • MultiSlide (2 rows) - Each row slides in opposite directions

  • MultiSlide (many columns) - Each column slides in opposite directions

  • MultiSlide (many rows) - Each row slides in opposite directions

  • MultiSlide (quad diagonal) - Each corner moves in a different diagonal direction

  • MultiSlide (quad orthogonal) - Each corner moves in a different compass direction

  • MultiSlide (weaving) - Lines and columns appear to weave in and out.


  • *Note: These transitions require the architecture of WMM 6.0 and can't be made to work on versions 2.6 or earlier.

    Monday, July 25, 2011

    Alias (or Simpsons) Title for Windows Movie Maker

    Preview Alias TitleIf you have ever watched the TV show Alias or The Simpsons, you've seen this title. It starts with a solid background and a title (such as the name of the location, or the words "The Simpsons"). Through that you can see the video, after a few seconds the words expand toward the screen and you can see the full video behind. Here's a sample video to help you visualize it.

    Note: This title will work in WMM 2.1 (XP) and WMM 6.0 (Vista/Win7). I've provided XML for both versions in the installers.

    There are two installers depending on whether you are running on a 32-bit or 64-bit version of Windows. The installer will put the necessary files into, C:\Program Files\Movie Maker\Shared.
    Blaine's Alias Title (32-bit)
    Blaine's Alias Title (64-bit)
    To use the new title:
    Go to 'Tools' > 'Titles and Credits' > 'Title on the selected clip'.
    Type your text in the first box.
    Click on 'change the title animation'.
    Under your list of one line titles, find the new animation:
  • Alias Title

  • As with other titles, you can change the font and other styling attributes. For the best results, pick a big, bold font like Arial Black. Note: the color you choose for the font will actually be the color of the background, since the video and text are reversed.
    Finally, click 'Done'.

    A couple additional things you might want to do. If you want the title to take longer, stretch it to the right. I added the 'Fade In from White' effect to the video so that the text would start white.

    Note: The latest versions of Movie Maker do not allow customization, so this does require a classic version of Windows Movie Maker. If you are on Windows 7, you can install WMM 6.0.

    Sunday, June 19, 2011

    Custom Camcorder Overlay Title for Windows Movie Maker

    Preview Camcorder Title OverlayI thought it would be fun to create an overlay that would look like you were recording through a camcorder. The overlay has a battery icon, a red recording symbol and the word 'REC' which flashes in the corner. As you can see from the sample video, I've created widescreen (16:9) and fullscreen (4:3) versions.

    Note: These titles will work in WMM 2.1 (XP) and WMM 6.0 (Vista). I've provided XML for both versions in the installers.

    There are two installers depending on whether you are running on a 32-bit or 64-bit version of Windows. The installer will put the necessary files into, C:\Program Files\Movie Maker\Shared.
    Blaine's Camcorder Overlay Title (32-bit)
    Blaine's Camcorder Overlay Title (64-bit)
    To use the new title:
    Go to 'Tools' > 'Titles and Credits' > 'Title on the selected clip'.
    Click on 'change the title animation'.
    Under your list of one line titles should be two titles:
  • Camcorder Overlay (16:9)

  • Camcorder Overlay (4:3)

  • Choose the one that matches your project, then click 'Done'.
    Stretch the title so that it extends for the length of your video.

    Thursday, May 26, 2011

    Custom Flash Transitions for Windows Movie Maker 6.0

    Blaine's Flash TransitionsI had a request recently in the forums for a Flash transition that would rapidly flash between two clips. These transitions come with a choice of 3 different flash speeds (fast, medium and slow).

    The transitions require the use of Rehan's ShaderTFX add-on. If you've never installed this before, follow the directions on his website and test they work first. If you've already installed a copy of ShaderTFX (registered or unregistered), you can skip these steps.

    For a preview of what the flash transition looks like, check out this Blaine's Flash Transitions in Action.

    There are two installers depending on whether you are running WMM 6.0 on a 64-bit or 32-bit version of Windows. The installer will put the necessary files into, C:\Program Files\Movie Maker\Shared.
    Prerequisite: Rehan's ShaderTFX add-on.

    Windows Movie Maker 6.0:
    Blaine's Flash Transitions (64-bit) Installer
    Blaine's Flash Transitions (32-bit) Installer

    After restarting Windows Movie Maker, you should have 3 new transitions with corresponding icons:
  • Flash (Fast)

  • Flash (Medium)

  • Flash (Slow)
  • Sunday, April 03, 2011

    Custom Pixelate Effects for Windows Movie Maker 6.0

    Blaine's Pixelate EffectsThe standard pixelate effect changes from no pixelation to full pixelation over time. I had a request of a version of the pixelation effect that has one level of pixelation and doesn't vary over time. So I've provided a set of 5 pixelation effects with sizes of 10, 20, 30, 40 and 50.
    Steps to install:
    1) Figure out if you are running a 32-bit or 64-bit version of Windows.
    2) Pick the matching installer.
    Blaine's Pixelate Effects (32-bit)
    Blaine's Pixelate Effects (64-bit)
    The effects will get installed in C:\Program Files\Movie Maker. After restarting WMM 6.0, you'll have five new effects in various pixelation sizes.

    Note: These effects will not work with the older 2.x versions of Movie Maker.

    Saturday, April 02, 2011

    Custom Resize Effects for Windows Movie Maker 6.0

    Blaine's Resize EffectsI'm rereleasing these effects with a pair of installers, in case you have a 64-bit version of Windows

    When dealing with pictures and videos in different sizes, it's often useful to be able to stretch or squash the clips to fit within the screen. You might also want to crop the edges or add a border. The following package of 'Resize' effects lets you do all those things. Preview a video of the 'Resize' effects
    Steps to install:
    1) Figure out if you are running a 32-bit or 64-bit version of Windows.
    2) Pick the matching installer.
    Blaine's Resizer Effects (32-bit)
    Blaine's Resizer Effects (64-bit)
    The effects will get installed in C:\Program Files\Movie Maker. After restarting WMM 6.0, you'll have a several new effects for adding borders (black or white), cropping, stretching, squashing and fitting to screen.

    If you have any questions on these effects, feel free to post in the forum topic on the Resize Effects

    Note: These effects will not work with the older 2.x versions of Movie Maker.

    Sunday, March 20, 2011

    Built-in Icons for Your Custom Transitions and Effects (in WMM 6.0)

    First, a disclaimer. I'm not providing any new transitions or effects in this post. This is an informational post for anyone creating their own custom Windows Movie Maker 6.0 transitions and effects that wants to use one of the built-in icons already inside of the program rather than having to design their own. WMM 6.0 has 95 built-in icons for transitions and 49 built-in icons for effects. But unless you know what they are, it's a bit of trial and error to pick one that matches your custom transition or effect.

    For the transitions, there are 95 icons (0 to 94). Click on the picture below to see a bigger image. The icon number will be the sum of the row number and the column number.
    WMM6 Transition Icons

    For the effects, there are 49 icons (0 to 48). As with transitions, the icon number will be the sum of the row number and the column number.
    WMM6 Effect Icons

    By the way, I previously posted on the Transition Icons and Effect Icons in Windows Movie Maker 2.x, if you are still looking for those.

    Sunday, February 27, 2011

    Blaine's Custom Cartoon Effects

    Blaine's Cartoon EffectsThe following effects can be used to give your photos and videos a cartoon look. There are 3 different "cartoonify" effects plus an additional "half tone" effect which can be applied as well. These effects work with Windows Movie Maker 6.0 (either under Vista or Windows 7).

    To see an example of the effects, check out the Sample Video of Blaine's Cartoon Effects

    To install the Cartoon Effects into Windows Movie Maker, you have a choice of installers depending on whether you are running WMM 6.0 on a 64-bit or 32-bit version of Windows. Pick the correct installer and it will put the necessary files into C:\Program Files\Movie Maker\Shared.

    Windows Movie Maker 6.0:
    Blaine's Cartoon Effects (64-bit) Installer
    Blaine's Cartoon Effects (32-bit) Installer

    After restarting Windows Movie Maker, you should have 4 new Cartoonify effects with corresponding icons:
  • Cartoonify, #1 through #3 - The colors are flattened and edges are highlighted in black.

  • Cartoonify, Half Tone - This gives an additional effect similar to a comic book printing


  • For a clip or image, pick one of the 3 cartoonify effects (#1, #2 or #3). If you like the half tone effect, apply that next to the same clip. Sometimes you may find that you need to brighten the clip or add a little blurring first. Play around with the effects until you get something you like.

    *Note: These transitions require the architecture of WMM 6.0 and can't be made to work on versions 2.6 or earlier.

    Tuesday, February 01, 2011

    Custom Spin and Zoom Effects

    'Spin and Zoom Effects' Video SampleThere was a request on the forums for variations on some of the standard Windows Movie Maker effects for spinning and zooming.

    Take a look at the video and if that is something you would like, click through to the post for the Custom Spin and Zoom Effects. Incidentally these are only for Windows Movie Maker 6.0 and won't work on WMM 2.x or Windows Live Movie Maker (WLMM).

    Saturday, January 29, 2011

    Blaine's Film Looks Effects for Windows Movie Maker

    Blaine's Film Looks EffectsThe following effects can be used to give your video more of a "film look". There are 9 different film looks available. These effects work with Windows Movie Maker 6.0 (either under Vista or Windows 7).

    To see a side-by-side comparison of each of the effects, check out Sample Video of Blaine's Film Look Effects

    To add the Film Looks Effects to Windows Movie Maker, there are two installers depending on whether you are running WMM 6.0 on a 64-bit or 32-bit version of Windows. The installer will put the necessary files into C:\Program Files\Movie Maker\Shared.

    Windows Movie Maker 6.0:
    Blaine's Film Looks (64-bit) Installer
    Blaine's Film Looks (32-bit) Installer

    After restarting Windows Movie Maker, you should have 9 new Film Look effects with corresponding icons:
  • Film Look - Bleach Bypass - simulates a common film printing process that results in higher contrast, lower saturation.

  • Film Look - Contrast - a higher contrast film look.

  • Film Look - Desaturation - a lower saturation film look.

  • Film Look - Enhance Colors - 6 color profile enhancements.


  • *Note: These transitions require the architecture of WMM 6.0 and can't be made to work on versions 2.6 or earlier.

    Saturday, January 01, 2011

    Blaine's Custom Transitions Pack 1 Released (Windows Movie Maker 6.0 only)

    Blaine's Transition Pack 1As a gift to you, I'm releasing a pack of new transitions for Windows Movie Maker 6.0*. These transitions require the use of Rehan's ShaderTFX add-on. If you've never installed this before, follow the directions on his website and test they work first. If you've already installed a copy of ShaderTFX (registered or unregistered), you can skip these steps.

    For a preview of what is included in the transition pack, check out this Transition Pack 1 - Sample Video

    For the new transitions pack, there are two installers depending on whether you are running WMM 6.0 on a 64-bit or 32-bit version of Windows. The installer will put the necessary files into, C:\Program Files\Movie Maker\Shared.
    Prerequisite: Rehan's ShaderTFX add-on.

    Windows Movie Maker 6.0:
    Blaine's Transition Pack 1 (64-bit) Installer
    Blaine's Transition Pack 1 (32-bit) Installer

    After restarting Windows Movie Maker, you should have 13 new transitions with corresponding icons:
  • Circle Stretch - The second clip appears in a circle and stretches out to replace the first clip.

  • Push Slide - These transitions push the existing clip out of the way. They can go in any of the 8 compass directions.

  • Wiggle In/Out - Either or both of the clips will transition in a wavy, wiggly pattern.

  • Zoom Blur - The first clip zooms toward the viewer and blurs to reveal the second clip.


  • *Note: These transitions require the architecture of WMM 6.0 and can't be made to work on versions 2.6 or earlier.