Tuesday, August 02, 2011

Blaine's Custom Transition Pack 2 (MultiSlide)

Blaine's Transition Pack 2Time for another pack of transitions for Windows Movie Maker 6.0*. I call these "MultiSlide" transitions. Check out the Transition Pack 2 - Sample Video and you'll see why.

These transitions require the use of Rehan's ShaderTFX add-on. If you've never installed this before, follow the directions and test they work first. If you've already installed a copy of ShaderTFX (registered or unregistered), you can skip these steps. There are two installers depending on whether you are running WMM 6.0 on a 64-bit or 32-bit version of Windows. The installer will put the necessary files into, C:\Program Files\Movie Maker\Shared.
Prerequisite: Rehan's ShaderTFX add-on.

Windows Movie Maker 6.0:
Blaine's Transition Pack 2 (64-bit) Installer
Blaine's Transition Pack 2 (32-bit) Installer

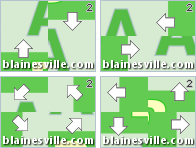
After restarting Windows Movie Maker, you should have 7 new transitions with corresponding icons:
  • MultiSlide (2 columns) - Each column slides in opposite directions

  • MultiSlide (2 rows) - Each row slides in opposite directions

  • MultiSlide (many columns) - Each column slides in opposite directions

  • MultiSlide (many rows) - Each row slides in opposite directions

  • MultiSlide (quad diagonal) - Each corner moves in a different diagonal direction

  • MultiSlide (quad orthogonal) - Each corner moves in a different compass direction

  • MultiSlide (weaving) - Lines and columns appear to weave in and out.


  • *Note: These transitions require the architecture of WMM 6.0 and can't be made to work on versions 2.6 or earlier.

    Monday, July 25, 2011

    Alias (or Simpsons) Title for Windows Movie Maker

    Preview Alias TitleIf you have ever watched the TV show Alias or The Simpsons, you've seen this title. It starts with a solid background and a title (such as the name of the location, or the words "The Simpsons"). Through that you can see the video, after a few seconds the words expand toward the screen and you can see the full video behind. Here's a sample video to help you visualize it.

    Note: This title will work in WMM 2.1 (XP) and WMM 6.0 (Vista/Win7). I've provided XML for both versions in the installers.

    There are two installers depending on whether you are running on a 64-bit or 32-bit version of Windows. The installer will put the necessary files into, C:\Program Files\Movie Maker\Shared.
    Blaine's Alias Title (64-bit)
    Blaine's Alias Title (32-bit)
    To use the new title:
    Go to 'Tools' > 'Titles and Credits' > 'Title on the selected clip'.
    Type your text in the first box.
    Click on 'change the title animation'.
    Under your list of one line titles, find the new animation:
  • Alias Title

  • As with other titles, you can change the font and other styling attributes. For the best results, pick a big, bold font like Arial Black. Note: the color you choose for the font will actually be the color of the background, since the video and text are reversed.
    Finally, click 'Done'.

    A couple additional things you might want to do. If you want the title to take longer, stretch it to the right. I added the 'Fade In from White' effect to the video so that the text would start white.

    Note: The latest versions of Movie Maker do not allow customization, so this does require a classic version of Windows Movie Maker. If you are on Windows 7, you can install WMM 6.0.

    Sunday, June 19, 2011

    Custom Camcorder Overlay Title for Windows Movie Maker

    Preview Camcorder Title OverlayI thought it would be fun to create an overlay that would look like you were recording through a camcorder. The overlay has a battery icon, a red recording symbol and the word 'REC' which flashes in the corner. As you can see from the sample video, I've created widescreen (16:9) and fullscreen (4:3) versions.

    Note: These titles will work in WMM 2.1 (XP) and WMM 6.0 (Vista). I've provided XML for both versions in the installers.

    There are two installers depending on whether you are running on a 64-bit or 32-bit version of Windows. The installer will put the necessary files into, C:\Program Files\Movie Maker\Shared.
    Blaine's Camcorder Overlay Title (64-bit)
    Blaine's Camcorder Overlay Title (32-bit)
    To use the new title:
    Go to 'Tools' > 'Titles and Credits' > 'Title on the selected clip'.
    Click on 'change the title animation'.
    Under your list of one line titles should be two titles:
  • Camcorder Overlay (16:9)

  • Camcorder Overlay (4:3)

  • Choose the one that matches your project, then click 'Done'.
    Stretch the title so that it extends for the length of your video.

    Thursday, May 26, 2011

    Custom Flash Transitions for Windows Movie Maker 6.0

    Blaine's Flash TransitionsI had a request recently in the forums for a Flash transition that would rapidly flash between two clips. These transitions come with a choice of 3 different flash speeds (fast, medium and slow).

    The transitions require the use of Rehan's ShaderTFX add-on. If you've never installed this before, follow the directions on his website and test they work first. If you've already installed a copy of ShaderTFX (registered or unregistered), you can skip these steps.

    For a preview of what the flash transition looks like, check out this Blaine's Flash Transitions in Action.

    There are two installers depending on whether you are running WMM 6.0 on a 64-bit or 32-bit version of Windows. The installer will put the necessary files into, C:\Program Files\Movie Maker\Shared.
    Prerequisite: Rehan's ShaderTFX add-on.

    Windows Movie Maker 6.0:
    Blaine's Flash Transitions (64-bit) Installer
    Blaine's Flash Transitions (32-bit) Installer

    After restarting Windows Movie Maker, you should have 3 new transitions with corresponding icons:
  • Flash (Fast)

  • Flash (Medium)

  • Flash (Slow)
  • Sunday, April 03, 2011

    Custom Pixelate Effects for Windows Movie Maker 6.0

    Blaine's Pixelate EffectsThe standard pixelate effect changes from no pixelation to full pixelation over time. I had a request of a version of the pixelation effect that has one level of pixelation and doesn't vary over time. So I've provided a set of 5 pixelation effects with sizes of 10, 20, 30, 40 and 50.
    Steps to install:
    1) Figure out if you are running a 64-bit or 32-bit version of Windows.
    2) Pick the matching installer.
    Blaine's Pixelate Effects (64-bit)
    Blaine's Pixelate Effects (32-bit)
    The effects will get installed in C:\Program Files\Movie Maker. After restarting WMM 6.0, you'll have five new effects in various pixelation sizes.

    Note: These effects will not work with the older 2.x versions of Movie Maker.