Saturday, March 16, 2013

Custom Camera Back Overlay for WMM 6.0

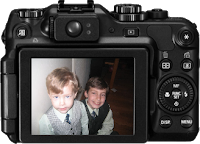
Camera back overlayFollowing my series of custom Movie Maker image overlays, here's an overlay where your video appears on the back of a digital camera.


There are two installers depending on whether you are running on a 64-bit or 32-bit version of Windows. The installer will put the necessary files into, C:\Program Files\Movie Maker\Shared.
Blaine's Camera Back Overlay (64-bit)
Blaine's Camera Back Overlay (32-bit)
To use the new title
  • Go to 'Tools' > 'Titles and Credits' > 'Title on the selected clip'.

  • Click on 'change the title animation'.

  • Under your list of one line titles there will a new title animation: Camera Back Overlay (4:3)

  • Pick this then click 'Done'.

  • Stretch the title so that it extends for the length of your clip.

  • Sunday, January 27, 2013

    Installing Windows Movie Maker 6.0 on Windows 7, 8, 8.1 or 10

    If you are reading this, I'm going to assume you've upgraded or purchased at least one PC with Windows 7, 8, 8.1 or 10 and discovered Windows Movie Maker is no where to be found. In its place, Microsoft offered a set of programs called "Windows Essentials" which included Movie Maker 2011 or 2012.

    Many people have tried these versions of Movie Maker 2011 or 2012 and complained about the lack of a traditional timeline, issues with crashing, long times to prepare video files and the inability to customize the transitions, effects and titles. If you have been building up a library of custom titles, transitions and effects under Windows Movie Maker 6.0, none of these can be used in the newest Movie Maker because the rendering architecture has changed and Microsoft has no API for customizing things.

    The good news is you can still use the latest version of Windows Movie Maker 6.0 from Vista. You can do this manually by copying the files from a Vista machine, registering some DLLs and creating a shortcut in your start menu. Or you can just use the installers I created below:
    Movie Maker 6.0 for Windows 7/8/8.1/10 (64-bit)
    Movie Maker 6.0 for Windows 7/8/8.1/10 (32-bit)
    There are two versions (64-bit or 32-bit) depending on the version of Windows you are running. If you are unsure, go to your 'Start' menu, right-click on 'Computer' and choose 'Properties'. System type should show 64-bit or 32-bit operating system. Pick the installer that matches. After that, don't forget to start previewing all the cool add-ons that you can have with this version.

    Note: I'm turning off comments on this thread since there are more than 200.

    Thursday, August 23, 2012

    Custom iPhone Overlay Title for WMM 6.0

    iPhone OverlayFollowing my series of custom Movie Maker image overlays, here's an overlay where your video appears on the screen of a iPhone.

    There are two installers depending on whether you are running on a 32-bit or 64-bit version of Windows. The installer will put the necessary files into, C:\Program Files\Movie Maker\Shared.
    Blaine's iPhone Overlay Title (64-bit)
    Blaine's iPhone Overlay Title (32-bit)
    To use the new title
  • Go to 'Tools' > 'Titles and Credits' > 'Title on the selected clip'.

  • Click on 'change the title animation'.

  • Under your list of one line titles there will be two new titles: iPhone Overlay FS (4:3) or iPhone Overlay WS (16:9)

  • Pick the one that matches your aspect ratio then click 'Done'.

  • Stretch the title so that it extends for the length of your clip.

  • Friday, July 27, 2012

    Wow! Title Variations for Movie Maker

    It was recently brought to my attention that the "Wow!" title animation in Windows Movie Maker will randomly choose the angle of the words. After a bit of snooping, I discovered there is a parameter to control this angle. As a result I decided to create this pack of Wow! Title variations so you can decide the angle (even upside down!)

    Note: These titles will work in WMM 2.1 (XP) and WMM 6.0 (Vista/Win7). I've provided XML for both versions in the installers.

    Here's a sample video to help you visualize the titles.

    There are two installers depending on whether you are running on a 32-bit or 64-bit version of Windows. The installer will put the necessary files into, C:\Program Files\Movie Maker\Shared.
    Blaine's Wow Titles (64-bit)
    Blaine's Wow Titles (32-bit)
    There are 4 different variations, but feel free to examine to XML to make your own variants. To use one of the new titles:
    Go to 'Tools' > 'Titles and Credits' > 'Title on the selected clip'.
    Type your text in the first box.
    Click on 'change the title animation'.
    Under your list of one line titles, pick the desired variant:

  • Wow! Tilt Up
  • Wow! Tilt Down
  • Wow! Straight
  • Wow! Upside-down

  • As with other titles, you can change the font, background color and other styling attributes. Finally, click 'Done'.
    Adjust the title duration by shrinking/stretching the rectangle on the Title Overlay track.

    Wednesday, May 02, 2012

    How to fix error 80004003 in Windows Live Movie Maker

    Error 80004003
    A number of people have been reporting corruption issues (error 80004003) when trying to reopen a Windows Live Movie Maker project. It happens after a person has made changes to a WLMM project then he/she tries to reopen the project. WLMM displays an error (80004003) saying that it is unable to open the file.

    Sorry, Movie Maker can't open this project file. The file might not be compatible with Windows Live Movie Maker or be corrupted.

    This post is for anyone that wants to know what is happening behind the scenes, or that wants to try to fix the problem on their own.  It requires some PC knowledge.

    The first step is to make a copy of the file so you aren't working with the original. You do this by copying the file in Windows Explorer then pasting it back into the same folder with a new name.  You'll want to use the copy, not the original. Right-click on the copy of the project file and choose 'Open With' and pick the Notepad application.  The file is text in the form of XML tags.  It's just a hierarchical mark-up similar to HTML.

    Scroll to the bottom of the file to find a <BoundPlaceHolders> section. It says that the "Text" section has an extentID of 4. Looking just above that you should see a section that starts with <ExtentSelector ExtentID="4" which lists all the added titles and captions by number. Make a note of all these because you'll need them later.  You might want to select and print just this section, or paste that list into another window so you can refer back to it.

    Now search further up for each section starting with <TitleClip. Ignore any sections that have a complete section between the <Effects> and </Effects> tags. Eventually you'll hit a few that just have <Effects/> (an empty Effects section).

    Check if that ExtentID is in the list of ExtentIDs in the Text section from before (the ones you made a note of). If it isn't you can ignore this, but if you find that it has an empty Effects section *and* it is listed in that block of text ExtentIDs, that's a problem.

    The quickest fix is to then go to the ExtentIDs section and remove that problem ExtentID.  It will remove that one problem caption and that will usually fix it, so you might be able to stop here. However, you should check all <TitleClip sections to be sure. After removing any problem ExtentIDs, you can save the file.

    You should now be able to open the project in Movie Maker just like before. You may need to recheck your captions and add back any that were removed, but at least you won't have a completely corrupted project.

    It's really not all that magical and can be done easily, if you are careful and only work in a copy.

    Edit: Since posting this, I've seen other corruptions unrelated to the captions. The newest corruption will still let you open the project, but you'll see nothing in the storyboard project area. Whenever I have encountered this, the cause was a VideoClip that had a start point (inTime) after the ending point (outTime). To fix this, you have to find the duration of the media item at the top and use that in place of the outTime for any clips that are set incorrectly. Again, always work in a copy, not the original.